Don Johnson's Website

My Personal 'Stuff'


Using a Palm Vx/m500 to Store/Play MIDI files
Updated - April 2020
UPDATE  Having been persuaded by John Smith to make a 20-note MIDI Busker organ to replace my Topsy - which was becoming too heavy for me to manage - I again looked at using a Palm device for music storage.   This time I started with a m515 instead of a Vx as it is more easily connected to a PC using USB, is therefore also faster at uploading music files, and can use an SD card for even more storage. 

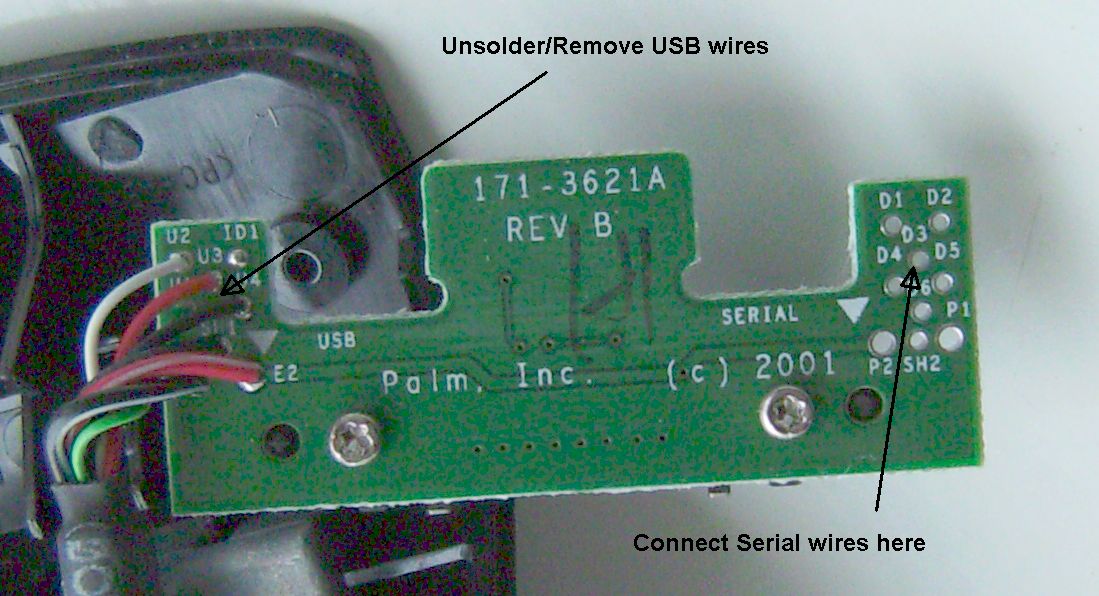
The only problem was to get a USB to MIDI interface - which, as before, I could not find.   Investigation of the innards of the m500 series cradle revealed that Serial connections are still available as well as those for USB, so the same Serial/MIDI converter can be used for connecting to an organ, whilst the USB connection is available for the PC.

Having got the system to work, I decided to update this page to improve and correct previous details about the m500 series.

Update April 2020 - Added Test MIDI with Anvil Studio
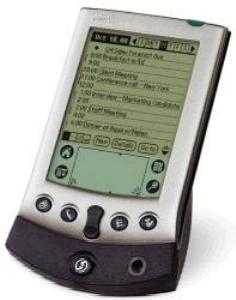
This article was originally written to explain how a Palm Vx can be used to play music on John Smith's Topsy organs, but the same setup can be used for any system needing to run MIDI files.     The Palm Vx is a PDA – or Personal Data Assistant – normally used for storing an appointments diary, notes, addresses and the like.
It has now been overtaken in the PDA world by much more up-to-date and sophisticated devices such as the BlackBerry, and even by mobile ‘phones.  As a result, fully-working second-hand Vx's and m500's are freely available - at very cheap prices - on E-Bay.

  The Vx has 8Mb of memory installed, but as the MIDI file for a single piece might be only 20kb, it can store hundreds of tunes.  Some of the m500 series have larger inbuilt memories, and can also store more files on replaceable SD cards.


*Although the details refer to the Palm Vx, the Palm V can also be used,  - but as it has just 1 Mb of memory, it can store only around 60 tunes.

An m515 Palm is the best Palm to use as has the larger 16Mb inbuilt memory, but any Palm from the m500 series will need a Serial connection cable for 'playing'
in addition to the standard USB cable for 'loading' supplied with the unit
Details for making the Serial connection cable are described at the bottom of this page.
Also the way to use the card on the m500's to store more tunes is here, just above the bottom of the page.


The Palm series of PDAs was very popular in its heyday, and lots of specialised software became available to run all sorts of functions on the devices.   One of these enabled MIDI files to be stored, and played back through the serial interface connector.   This interface is part of the cradle system that is used to charge the Palm, and to enable it to connect to a PC for up/down-loading the normal PDA data to an office computer.   The software that I use is called ‘ittyMIDI Player’, and was previously available from Micro Tools,
but they have now closed their ittyMIDI website.   Please contact me for the latest information about obtaining a copy (e-mail address on my Home page).

For the Vx, it is possible to connect to a USB port on the PC in place of the serial port, using a USB to serial cable adaptor - available on the Internet.   However, as the system treats the converter as a virtual COM port, there appears to be no speed advantage.  On the m500's a USB connector comes as standard, and Hotsync transfers certainly are much faster.

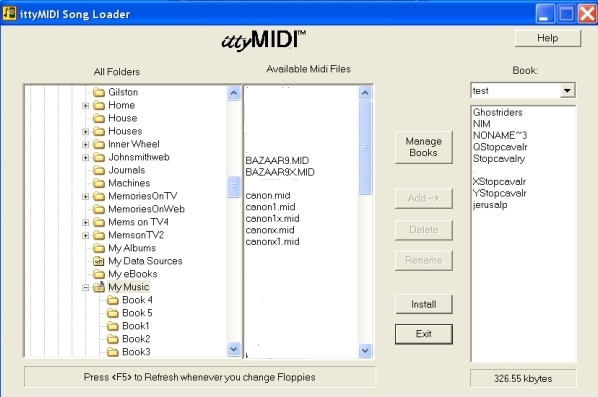
The ittyMIDI software is actually in two parts.   One is the ‘Loader’ which is installed on the PC where you manage/compose/edit your MIDI files, and the other is the ‘Player’.    The Loader program enables MIDI files to be selected and put into groups – or Books - for sending to the Palm when it is sitting in its cradle, and the button on the cradle is pressed to perform the ‘sync’ function.   Sending the data is automatically managed by HotSync Manager which controls how the PC communicates with the Palm cradle.   Hotsync Manager is part of ‘Palm Desktop 4.1.4’ (click here to download if you don’t get the software CD with your Vx).   After installing Palm Desktop 4.1.4 on your PC, it can be ignored - only the Hotsync Manager is needed (unless you use MemoPad for storing tune names).  Usually, after Hotsync has been started, right-clicking on its icon at the bottom of the screen enables Local Serial to be ticked - and also Local USB if a converter cable is being used.  Hotsync automatically checks to find if the correct serial port is activated.

The Palm Desktop software has been updated (currently version 6.2), but the newer version does not work properly with the Loader -  the Loader is unable to 'find' the Palm User Name.   For this reason, use the 4.1.4 version, NOT a later update!

If you wait patiently, you can see a video about using the IttyMIDI Song Loader here
Loader Screen

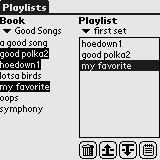
Prior to sending the MIDI files to the Palm, the Player program is also sent from the PC to the Palm sitting in its cradle. This is done automatically by the ittyMIDI software the first time a ‘sync’ is initiated after the software is loaded onto the PC **.   The Player program remains permanently on the Palm, and is quite comprehensive, enabling the touch–screen on the Palm to be used to select MIDI tunes by name from the Books of stored files that have been sent from the PC.   It can make changes to Pitch, Tempo, etc., and can be set to play a tune repeatedly, play a sequence of tunes, or even a selection of ‘Measures’ within a tune.   You can also generate Playlists from the tunes stored in one or more Books, so that particular programs of music can be stored, and played as desired.  (Books can be deleted on the Palm, but cannot be edited.   Playlists can).

  **  If the Player program fails to appear on the Palm, it may be necessary to uninstall ittyMIDI from your PC, DELETE THE FOLDER in which it was stored (. . . Program Files/ittyMIDI e.g), and then re-install it so that the program is not confused as to whether the Player has been installed already despite a previous installation not having worked correctly.

Some of the Player Screens
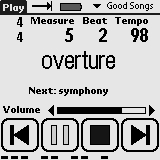
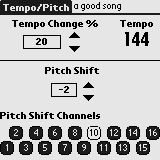
These are accessed by tapping the top-left corner of the screen, or by using the Up/Down buttons at the bottom of the Palm.   The starting measure and tempo can also be changed by tapping the Measure or Tempo screen tabs and using the Up/Down buttons.

Song Selection

Play Screen

Change Pitch/tempo

Registration Code
The first time that the Player is started after the initial Hotsync is run after installation of ittyMIDI on the associated PC, the program will ask for a Registration Code.   It should also display the name that is to be used when the code is/was obtained. If no name appears on the Registration screen (above where the code is to be entered) you will need to contact me to get my Registration code, and use that with my name for the Palm Desktop User.   This is because Micro Tools no longer sell or maintain the ittyMIDI software, so it is not possible to Register with them.  If no name still appears, it may be worth trying a cold reset of the Palm, then open Palm Desktop, add a new user (eg Fred) and delete Don Johnson.   After confirming that all data will be lost, add user Don Johnson again and delete Fred.  Then try another Hotsync operation.  Until a correct Registration code is entered, Player will keep asking for one, and if one is not entered, tunes will play for only 15 seconds!                          


MIDI Interface
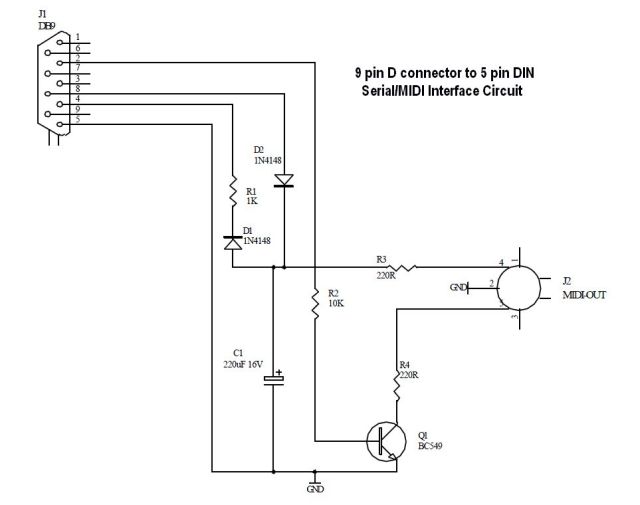
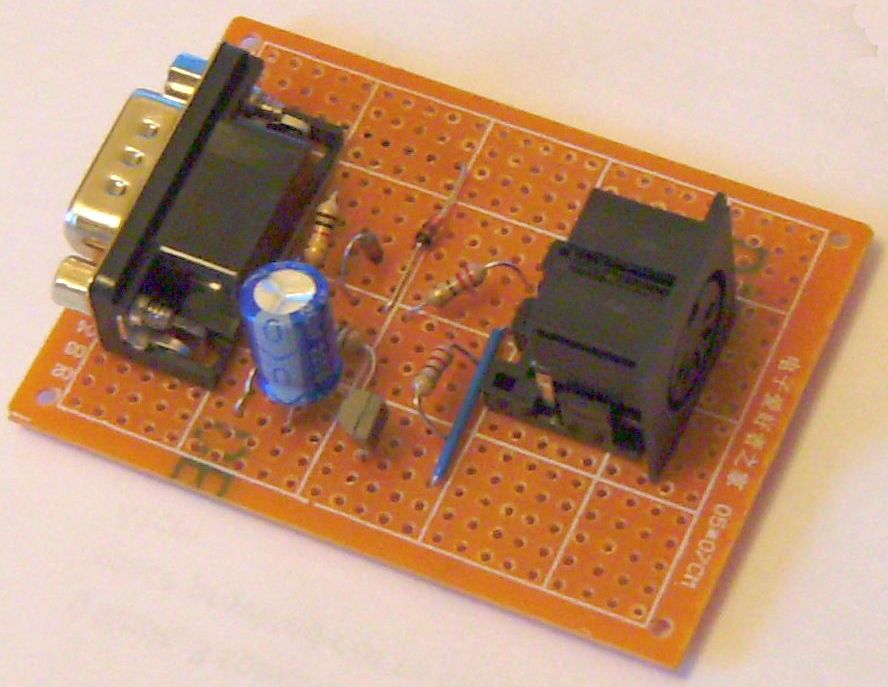
To enable the Palm to communicate with the MIDI Interface Board in an organ (typically, the MTP-8 board obtainable from jw Electronics or the MiditoOrg 64/32 from Orgautomatech), for the older Palms, a Serial/MIDI converter is required.   This is a very simple circuit, with just a few components and a serial connector on one side and a DIN connector on the other.   There is a diagram at the bottom of this page, and Ian Jeffreries used to sell a complete unit for £15 including postage - but unfortunately he has now passed away to the great Electronics Lab in the sky so you will have to make your own!  

As the Palm m500's come with a USB connector as standard, it might seem sensible to obtain a USB/MIDI adapter, but the only items I could find seemed to be for connecting a PC to a MIDI device.   Whether these would work with the Palm providing the output I have not tried, but certainly the USB connector would be the wrong type - a female/socket would be needed for the Palm cable to plug into.  Other USB/MIDI converters seem either very complicated or more expensive.

The solution is to add a Serial interface cable to the m500 cradle - or, preferably, modify the USB cable on a separate cradle used permanently with the organ.   This can be connected  to the MIDI Interface board using the same Serial/MIDI converter for the older Palms, mentioned above.  Details of where to re-connect this cable inside the cradle - with its USB connector replaced by a 9-pin Female D-type connector - are shown here.  As the cradle normally just sits  on its rubber pads, it can be tricky to fix it semi-permanently.   One way to fix the cradle inside an organ is to open up the cradle and remove the SYNC button, and the surface mount switch it operates on the small circuit board (by clipping its legs).   Then, reassemble the cradle and drill a hole - angled like where the SYNC button was - through the circuit board and the base of the cradle.  A screw with a washer inserted through this hole and into the board on which the cradle is mounted holds it firmly in position, but can easily be removed..

What is needed for this system
A Palm, the ittyMIDI software, the Palm Desktop/Hotsync Manager software, the Serial/MIDI interface, and the Palm mounting cradle.   I actually have one  m500 series cradle permanently connected to a USB port on my PC, and another permanently mounted in my organ.   I could have purchased the second cradle as a separate item, but the Palms are so cheap, I purchased TWO complete packages.  I got not only two cradles, but also a spare Palm in case one failed - or its battery ran out during a performance.  The Serial connector lead from the cradle in the organ is connected to the Serial/MIDI interface - with its DIN connector connected in turn by a lead to the input of the MIDI Interface Board.

After tunes have been loaded onto the Palm from the PC, the Palm is transferred to the cradle mounted in my organ.  Tunes can be picked using the Palm’s stylus.   Using the Palm is very easy, and tunes can be selected quickly and played without fuss.    I have not used other systems, but they would have to be very good for me to swap from the simplicity and functionality of use of the Palm.    With my Topsy, having around 200 tunes stored, I had used 3.1M of an available 7.7M on a  Vx, so I think I would have room for around 500 tunes in all.  With an m515 there is even more internal room, plus the vast amount available with SD cards (see caveat under Backups)  

Backups
Each time tunes have been loaded onto the Palm from a PC, it is sensible to make a new backup, so that if the Palm battery runs out and the Player and tunes disappear, they can easily be restored without having to go through the process of reloading the tunes using the Loader and re-registering the Player on the Palm.    The process is simple:   to make a backup, use the Hotsync Custom screen to set all Actions to 'Do Nothing' apart from System - which should be set to 'Handheld overwrites Desktop', then perform a Hotsync.   After a Hotsync all Actions return to their default states, which for the System Action would normally be 'Do Nothing'.  Set this to 'Desktop overwrites Handheld' whenever it is necessary to re-install the ittyMIDI files onto a re-charged Palm.  The changed function of the 'To Do List' button is also restored (see Digitizer Problem below).

The function tries to write the backups  to a folder under   . . . . .Program Files(x86)/palmOne/'User'/Backup  (my 'user' was 'JohnsoD').   If files with the correct date/time do NOT appear, change the properties of the folder under Security to allow 'Full Control' for yourself as the computer user, then reset the Hotsync Custom Actions and repeat the Hotsync.

There is a problem when storing tunes on the card in the m500 series - the backup performs OK, but the 'restore' function (with the older Palm Desktop version) does not seem to be able to load files onto the card.   I tried various tricks such as removing the card before backup - as the tunes should still be there - but when restoring from the backup and re-inserting the card, messages about 'file database corrupted' appear.   Perhaps I will eventually find a solution for this!   However, reloading one's books and setting their destination to internal or card memory (see 'Using a memory card on the m500's' below) does not take long, and the transfer time is not much different to using the Backup system.


Finding Tunes
I created a table in Word, which for each tune contained the full title, the Book in which it was stored, its number in the Book list, and the abbreviated tune title.   After sorting by the first column, I printed the table to give myself an alphabetical list the tunes, which would enable me to find a particular title quickly, and locate it on the Palm.  But this meant that I had to remember to keep the printed list handy.  I then had the startling revelation that I had a means of storing the list electronically, by using the Palm itself - Doh!   Obviously it would be rather time-consuming to try to enter all the tunes using Graffiti, but I had the Palm Desktop Manager available on my PC to ease the entry of data.

Addenda
Palm Vx Digitizer problem
On one of my Vx’s, I did have occasional problems with the touch screen digitizer going out of alignment.  To correct the problem requires the ‘Digitizer’ function to be called from the drop-down menu in ‘Prefs’.   However, if the digitizer setting is ‘off’ by a large amount, it is can be impossible to get to the ‘Digitizer’ function!    Catch 22!    Using the Reset function can solve the problem, but the Player software then has to be reloaded afterwards. (If the Welcome icon CAN be activated - by tapping away from it by the amount the Digitizer is 'off '- this will reset the Digitizer)

However, my long-term solution to this problem is to program one of the physical buttons on the Palm to call the ‘Welcome’ function - which prompts the setting up of the digitizer.   Obviously this must be set up when the digitizer is working correctly, by selecting ‘Buttons’ from the drop-down menu in ‘Prefs’.   The bottom left-hand button on the screen then shown is usually set to access ‘To Do List’, but I changed this by scrolling the selection box down to ‘Welcome’.   Thus if I ever have digitizer problems, I click the physical 'To Do List' button at the bottom of the Vx, and the digitizer set-up function runs as part of ‘Welcome’, and sanity is restored!


As the Player program uses the physical buttons for its own purposes, the 'Welcome' function is not available from within Player.   Since the Palm usually restores itself to the function running when it was switched off when switched on again, it is sensible to make a habit of
leaving Player before switching off.  This ensures that if the Digitizer has gone mad whilst the Palm was inactive, the physical button will be able to restore sanity.


To 'store' the change to the 'To Do List' button so that it will be reloaded into the Palm from the backup files on the Desktop (such as if the Palm has been completely reset or has lost its Player contents due to the battery running out), set the Hotsync Custom setting for System to 'Handheld overwrites Desktop' and perform a Hotsync.  When complete, check that the System setting is restored to 'Do Nothing' or  'Desktop overwites Handheld' for future use.   

In-situ Battery Charging
Vx -
Since there was a possibility of the Vx battery in Topsy running out, I added another item later to prevent this happening during a performance.   The Palm is normally charged when it is sitting in its cradle, from a mains adaptor that plugs into the serial connector connecting the cradle to the PC.  (It looks like a permanent connection on the serial connector, but is actually a small plastic connector plug).   However, there is normally no mains supply available when performing - but there was a 12V supply!   Therefore, I obtained a charger for L-ion batteries in digital cameras - a particular version which can be supplied from 12 / 24V as well as 230V ac mains, and which is for the same voltage battery as that fitted in the Vx.

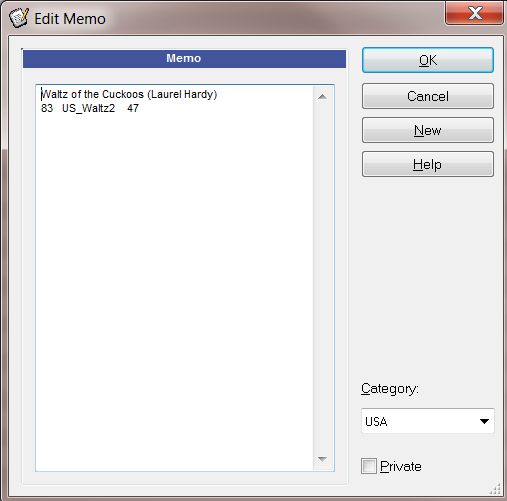
It appeared that the 'Memo Pad'  would be the most suitable function, so I created some new 'Categories' - giving them the names of the Books in which the tunes were stored.    I ended up with Memo Pad entries such as that shown here, where the title was the full tune name (Waltz of the Cuckoos (Laurel Hardy)), the category was the Book name (USA), and the memo text was the tune's number in the Book (83) plus the actual tune file name (US_Waltz2).  The last digits (47) refer to the Measure at which this tune starts (the file contains a medley of tunes). I adjusted the Hotsync Custom settings for Memo Pad to ‘Desktop overwrites handheld’, so the next HotSync transferred this data to my Palm.
If I need to find a particular tune, even if I am running 'Player' on the Palm, I use the 'Search' function (magnifying glass icon on the touch screen) to look for a keyword in the tune title, and then tap on the appropriate entry that appears under Memo Pad.   I then see the Book details, so can return to 'Player' to select the appropriate Book, and step forward to the tune number - and measure if necessary - which is simple and extremely efficient!   I felt very pleased with myself - so immediately added the 'Finding Tunes' section to this page, so that others might share my system.    I have around 200 tunes, but the Memo Pad entries only take up 16Kb of memory on the Palm.   I understand that a facility like this is NOT available on SD Card Players - another good reason for using the Palm!


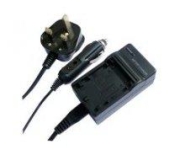
This is the INOV8 LPE5 Charger, available from various Internet suppliers - including Amazon - which has a nominal output of 4.2V, which is suitable for the 3.7V battery in the Vx.    I chopped the Vx mains adaptor off the other end of the cable joined to the little plastic plug on the Serial connector, and reconnected the cable to the innards of the battery charger. (Red wire to OUTPUT +).   Opening the charger case requires some force to break internal glue joints - even after the case screw is removed!     I left off the 13A mains connector plug insert, and fitted the battery charger permanently inside Topsy.   (Some of these chargers don’t have inserts, they have a permanently-connected 13A plug on a mains lead – this lead should be disconnected inside the unit, and removed).
The small 12V input socket on the charger accepts a 3.25mm od/1.3mm id connector plug, one of which was on the car lighter socket cable supplied with the charger.  I removed the big lighter connector, and connected the cable to Topsy’s 12V supply.   The LED that normally indicates charging does NOT illuminate under these conditions, but the Vx battery is being charged.   The current drain for charging the Vx is minimal, and will not affect Topsy’s 12V battery life.  This charger is perhaps a luxury, and probably not really required - so long as a Vx is fully charged before use in Topsy, but it is a comfort to know that the Vx will not die unexpectedly!

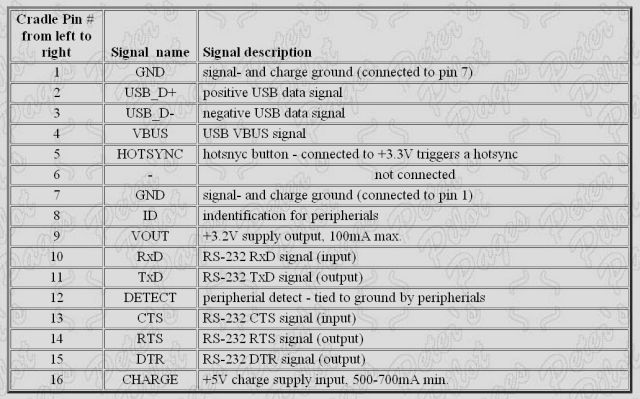
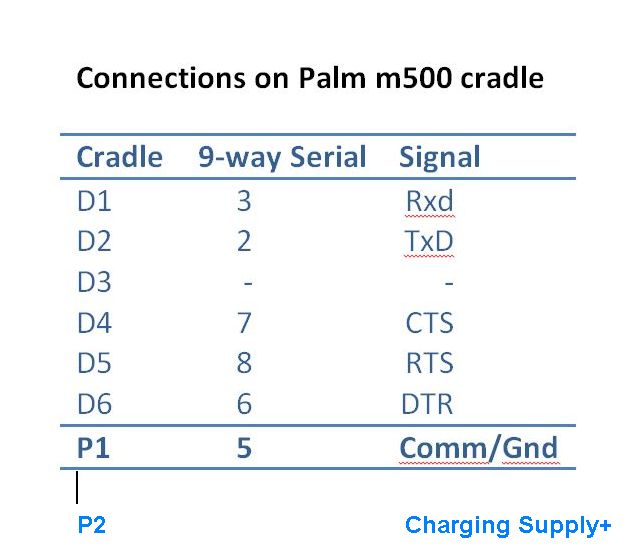
m500's - The battery control circuits in the m500's are built into the Palm, so there is no need for a separate battery charger - all that is required is a STABILISED* 5V supply (+ve to pin 16, -ve to pin 1 on the connector - or pads P2 and P1 respectively as shown in the Serial Connections for the m500 Cradle below) which can be derived from the battery supply in the organ.    However, as the m500 series batteries have more capacity than those on the Vx's there is probably no need to have a charging system in the organ itself.  * Although a stabilised supply is mentioned elsewhere, my m500 charger unit says it has an output of 12V, and I have also achieved successful charging using the 6V from the battery I have in the organ.

Replacing a V/Vx battery
It is true that some of the rechargeable L-ion batteries in Vx’s do not last for ever, but replacements are available on the Internet – search for ‘Palm Vx battery’.   Fitting them, however, seems to be impossible as there appears to be no way to open the case.   Actually, it can be done, using the instructions detailed at Ifixit For just replacing the battery, you will only need the instructions in steps 1 - 4 (just removing the back).  Unplug the battery connector, then if the battery cannot be prised off, follow steps 10 - 12.   After replacing the battery, replace the back, and re-apply some heat to seal it.

At first sight, it all appears quite daunting, but only the back has to be removed to be able to swap the battery - removing the screen is not necessary.   However, it was with some trepidation that I approached the task myself.   However, by following the – very clear – instructions, I managed to complete the battery change without any major problems, apart from with my blood pressure.   Knowing I had the other Vx as a spare was my only comfort during the process, but afterwards I realised that I should not have been so worried. 

Replacing an m500 series battery
The battery for the m500's is larger than that for the V series, but is more easily accessible, providing you have the right tool - usually a T5 sized Torx screwdriver or a tiny Philips cross-head screwdriver for some early m500s.  Don't try to open the case without the correct tool, you will probably damage one or all of the four screws and make it impossible to open at all.   After removing the four screws, the back still has to be 'popped' open with a thin blade around the top and sides of the back cover join, and it does take some effort to get it to open.    After replacing the battery, the back has to be snapped closed - again with some conviction - before inserting the four screws.  I found an '8 in 1 Torx screwdriver' on e-Bay (item 380118497364) for only £2.40 post free! 

Upgrading Palm O/S for III and V versions to 4.1 (not needed on m500's)
The Upgrade software (PalmOS4-1.zip 42Mb - click here to download) begins by installing a version of Palm Desktop on your PC, in the directory C:\Palm.    The ‘normal’ software for Palm Desktop  (PalmDesktopWin414EN) installs into C:\Program Files\palmOne.

If you have an alternative PC or laptop available it may be best to install the upgrade version software on that machine – after removing any existing Palm desktop program - so that there can be no conflict.  If you have any data on the Palm that you want to keep, then whatever you do, before anything else, perform a full Hotsync backup of your data onto your PC with your existing setup .  If it is only MIDI tunes that are to go on the Palm, then these can be re-installed later by the Loader, so no backup is necessary.

If no other machine is available, then try using the upgrade software whilst retaining the ‘existing’ Palm Desktop, following the method described below.  If this fails to work, then uninstall both the ‘existing’ program and the upgrade, and then install the upgrade software alone.   This method means that a user name has to be entered  - so there are no conflicts when starting the actual upgrade process.   When the OS upgrade is complete, uninstall the upgrade software and reinstall the ‘existing’ Desktop. 

Clear ?

Installing theUpgrade
After unpacking the upgrade software, run ‘autorun.exe’ file from the folder into which the files were unpacked.   Select ‘Palm OS 4.1 Upgrade’, and your particular palm device on the next screen.    You can now follow the on-screen instructions to install the Desktop software.   At the end, when you click ‘Finish’, you will go into the start of the Flash Update routine.

Before following the on-screen instructions, you will need to ensure that Hotsync Manager (C:\Palm\HOTSYNC.EXE) is set up correctly.   Start Hotsync, then right click on the icon in the Taskbar when it appears, and, whichever you are using, select ‘Local USB’ and ‘Local Serial’.  It is OK to have both ticked, and if you are using a USB/Serial converter for the connection, then Hotsync seems to like it that way.  Also, right click on the icon again and click Setup, then General/’Always available’ and  Local/your serial com port and ‘As fast as possible’.  One more right click on the icon, and select ‘Exit’ – the Flash update software should start and stop Hotsync as it is needed.

Going back to the Flash update window, you are prompted to do a Hotsync to create a backup of the data on the Palm, and to watch the palm screen for the eventual ‘Reset’ instruction.  After doing this, ‘next’ should become available on the PC.   Clicking on ‘next’ should start the Operating System download, and – after accepting that all data will be destroyed - you will get some strange screen displays - which are quite normal.   At the end of the update, you will be prompted to Restore the backed up data – I found I sometimes had to retry this to get it to work, but it is not really needed so if it fails to work, skip it, and exit the Flash update program.

If the above has worked as expected, remove the Update Desktop software from the PC (and re-install the ‘existing’ Desktop if it had been removed).   You may now need to start Hotsync manually (from C;\Program Files\palmOne\HOTSYNC.EXE), and set it up as described above.  I now recommend performing a ‘cold’ restart on the Palm (hold the start button down whilst pressing in the reset hole with the tool from the end of the stylus – or a paper clip), to clear all data stored.   Performing a Hotsync should now restore all the data in the backup made at the beginning, and the Palm should be running as normal but with the 4.1 Operating System.
 
Normal Settings for Hotsync
The basic settings are given in an earlier paragraph, but as you are just using the Palm for MIDI files, then there are some other settings worth adjusting.  Right-clicking on the Taskbar Hotsync icon, and selecting ‘Custom’, opens a screen where the actions for each of the normal Palm functions can be set.   Click on each one in turn, and then ‘Change’.   Set the radio buttons to ‘Do Nothing’ and tick the box ‘Set as default’.   This can be done for ALL the functions, For the first Hotsync, or to add tunes, temporarily set ‘Install’ and possibly 'Install to Card' to ‘Enabled’.  If you are using Memo Pad to store a searchable list of your tunes, when you want to update the list on the handheld, temporarily set Memo Pad to ‘Desktop overwrites handheld’.  When all functions are set, click on ‘Done’. Note that settings return to their Defaults as soon as a Hotsync is performed.

You may have chosen to set one of the handheld’s buttons to the ‘Welcome’ function (using Prefs/Buttons) so that you have a means to rest the Digitizer even if it has gone too far ‘off’ for normal selections.  If so, you may want to use the ‘Custom’ function mentioned above to set ‘System’ to ‘Handheld overwrites Desktop’ for the first Hotsync after setting the button, and to ‘Desktop overwrites handheld’ thereafter.


If you wait patiently, you can see a video about setting up Hotsync Manager here


Connector Pin Outs

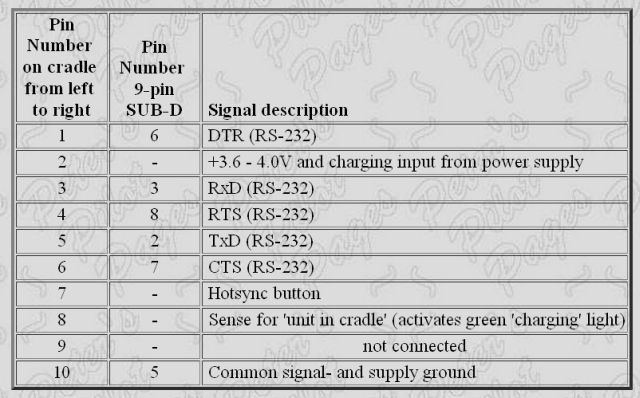
I found the following pin outs on 'Peter's Pilot Pages' -  www.pspilot.de - which contain loads of very useful background information on the Vx, m500's and other palm devices.   The Vx has the 10-pin connector, and the m500's the larger 16-pin version.

Using a memory card on the m500's
To enable the ittyMIDI Loader to put 'books' of song files onto a Digital card plugged into an m500 instead of into its normal memory,  it has to be 'advised' before a Hotsync is performed after 'books' have been created in the Loader.
This requires the use of the Instapp.exe program that is part of the Palm Desktop software package (usually found in . . ./Program Files/palmOne/ ).  When this program is started, first select the User, and then Add.   Use the Look in box to navigate to  . . . .Program Files (x86)/ittyMIDI/Player and you should see the name(s) of the Books which you have just set to 'Install' in the Loader.   Clicking on a Book name should reveal two .pdb files.  Highlight both these, and then click on Open - which will add the highlighted files to the files list.   Click on Add again, and use the 'Up one folder' icon to go back to the list of Booksto repeat the process for all the Books that you want to go onto the SD card.
Now click on Change Destination.  A further window opens, which has columns for the 'Handheld' and the 'Secure Data Card' (or whatever) destinations.   Highlighting the appropriate files and clicking the >> or << arrows in the middle enables them to be located appropriately.  Clicking OK and Done completes the process, ready for the following Hotsync.  
The card simply acts as a memory extension - the files cannot be displayed separately, and when the Player is started on the Palm, if it finds books with the same name in internal memory and on the card, it declares that it will ignore one of them.   This message can be very irritating as it repeats each time a Book is selected, so try to avoid accidentally putting Books in both memories.
A stated previously the files from the Loader are usually located in a folder in the  . . . . /Program Files/ittyMIDI/player directory, and it is these that are redirected as above.  However, if - like me - you occasionally let your Palm die from battery exhaustion, your Player program and  books will be reloaded from a previous 'handheld backup' when you recharge and do the next Hotsync.  
Under those circumstances, the files for the books will be taken from:  . . . Palm/User_name/Backup, so if you want these to go onto the card, you will have to 'Add' them manually in the Instapp program by browsing to find them.  My user name was JohnsoD.
Obviously, if all your books were on the card, they would probably still be there even though the Palm had 'died', but the ittyMIDI database of file locations may be corrupted by the 'dying' of the Palm, so it may be best to Reformat the card, and use the Loader and Instapp routines again...

Serial/MIDI Interface Circuit

(originally published by Elby Designs)

Serial Connections for m500 series Cradle

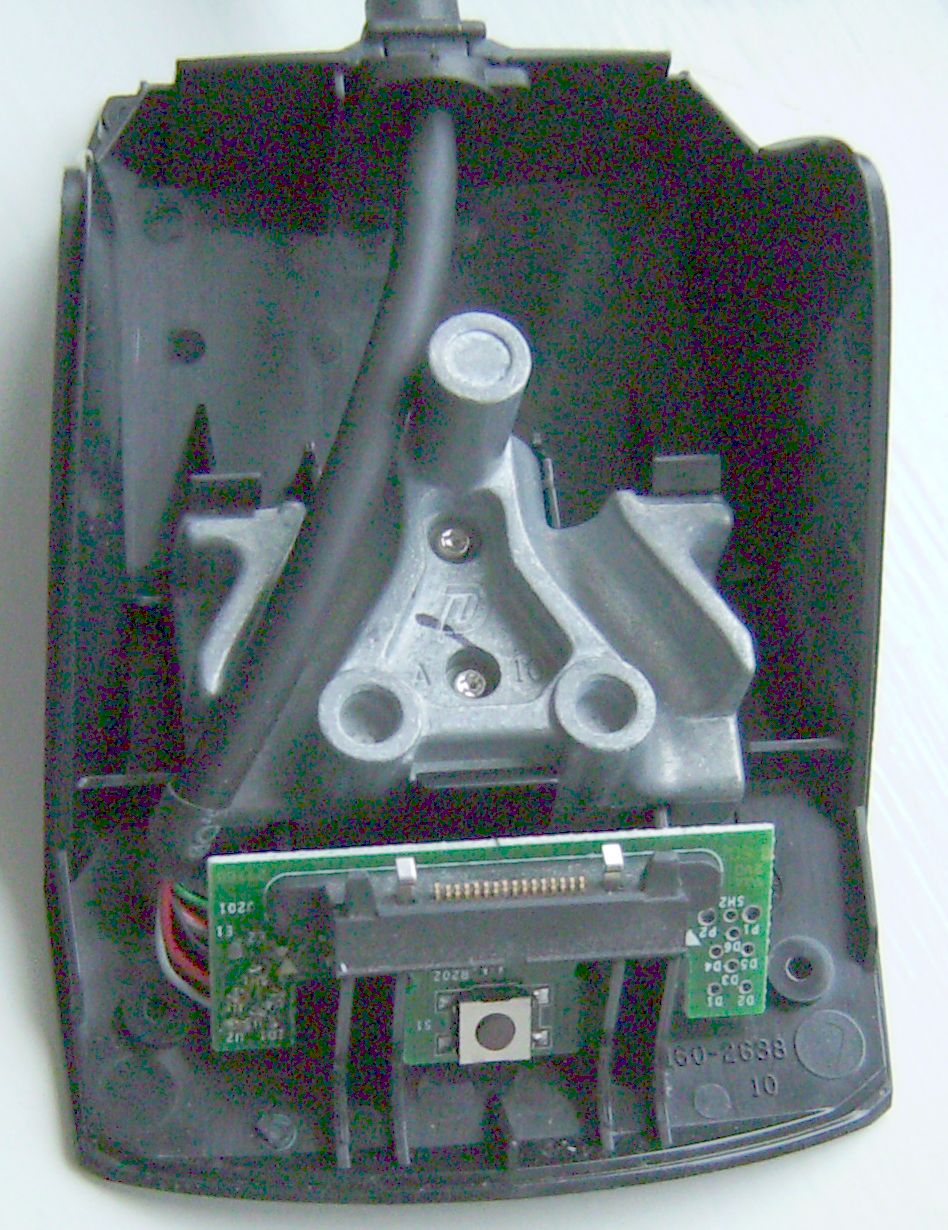
Inside of m500 series cradle
(remove T6 Torox head screws under rubber feet to disassemble cradle)

Connector board showing USB and Serial connector tags

Unsolder and remove the USB connection wires and cable from the cradle.   Connect a 6-way cable to the Serial tabs shown above.   The other end of the cable is attached to a 9-way Female Serial D-Type connector for connecting to the Serial/MID Converter.   If you want to charge the Palm whilst in the organ, as mentioned above, the charging supply positive goes to P2, and the negative to P1.   If you have used a serial cable from a Vx - which already has a 9-way serial connector moulded on - you could use the wire connected to pin 3 on the 9-way for getting a connection to the charging supply positive onto the Serial/MIDI Converter board, as the Rxd (Received Data) signal is not used.

(BTW - I DID use a Vx cable, which does not have a connection to pin 4 (RTS?) but does connect to pin 8 which is also called RTS in the table above.   I'm not sure why, therefore, but the system works fine, so why worry?)

Using Anvil Studio to test MIDI

As an aid to checking MIDI set-ups, Anvil Studio has a facility that may be of use if you can get it working.  I eventually managed to set things correctly to monitor incoming MIDI signals as well as to send test signals out, but Anvil seems to need things done in a certain order for it to work correctly, so this is what I did:
For monitoring the input MIDI I connected the IN DIN plug on a USB to MIDI Converter (from Ebay) to the OUT MIDI socket on the Control Board.
I started Anvil Studio, THEN connected the USB plug on the Converter to the PC

XXXX
  
On Anvil, I clicked on View then Mixer.
   I then clicked on the Jack Plug symbol (between fx and Keyboard)
   In MIDI Out devices I selected MIDIOUT2 USB2.0-MIDI (Your Converter may have a different name)
   in Enabled MIDI in Devices I ticked the box beside USB2.0-MIDI
   I then clicked on TEST MIDI Connections (near the bottom of the right-hand column)
   I turned on the Organ power
I played the tune on the Palm, and the computer displayed the MIDI signals on the Left-hand display whilst the speakers played the music
(when the tune ended, a note continued playing so I clicked on View at the top and Piano Roll Editor then clicked on a note to stop the one continuing)
I initially tried monitoring the output of the serial/MIDI interface board directly with no success.It may be that the interface board signal levels and handshakes are OK to feed the relay drive board, but not to feed to the PC via the converter cable. However, the signal levels and handshakes of the OUT port on the relay drive board ARE effective for monitoring with Anvil..
To test sending notes to the organ, I connected the OUT plug of the MIDI/USB Converter to the IN socket on the Control Board in place of the connection from the Serial/MIDI converter
I then repeated the steps shown at XXX above
I then clicked on Start sending notes and I could hear my Organ solenoids clicking, whilst the notes being sent were listed on the right hand screen, and the MIDI signals on the Left.
I used Stop to end the test, then stopped a continuing note as above.